About this Manual

This manual is for System Administrator who want to manage linked data applications developed using Callimachus. Those new to Callimachus should start by doing the Callimachus Meeting Notes Tutorial.
If you have not installed Callimachus yet, please follow the installation instructions in Getting Started with Callimachus.
Chapter 1. Installing Callimachus
In this chapter we will explore how to setup Callimachus. The order in which these steps occur is important, so follow these steps chronologically.
1.1. Prerequisite 
| Requires | Details |
|---|---|
| RedHat Enterprise Linux 64bit | Callimachus Enterprise must be installed on a RedHat Enterprise Linux 6.1+ 64bit server. |
| Java 7 JDK | Callimachus currently requires Java 7 JDK with ECMAScript 5. OpenJDK is recommended. |
| setcap | Callimachus Enterprise requires the binary setcap - set file capabilities - to be installed and available in the PATH. |
1.1.1. Terms to Know
To fully understand this support documentation, it is crucial to understand exactly what the terms used are referring to. Please read and refer back to the list below when necessary.
| Instance | The term instance refers to a Callimachus installation. |
|---|---|
| Deployment | The term deployment refers to an entity comprised of one (database) repository and one primary origin. The existence of only one primary origin means there is only one /callimachus/ folder being used. Tip: A deployment is analogous to a "virtual host" in the Apache Web server. Note how realms may be also used to create virtual hosts. |
| Realm | The term realm refers to a URI space with its own authentication, layout, and set of allowed origins. Realms exist within deployments are specified with a path. A realm must differ from its deployment by origin, path, or both. Tip: A realm is similar to a realm in the Tomcat servlet engine in that it has a separate authentication and authorization space. Callimachus realms may be used to make "virtual hosts" but all hosts will share a single database repository. |
There is a 1 :: n cardinality relationship moving down the list of terms. A single instance can have multiple deployments and a single deployment can have multiple realms.
1.2. Installing Callimachus Enterprise 
Extract the Callimachus-Enterprise.zip into an empty installation directory. The recommended file path for Callimachus Enterprise is /opt/3RoundStones/Callimachus-Enterprise/. To do this, issue the following commands:
# mkdir -p /opt/3RoundStones/Callimachus-Enterprise
# cd /opt/3RoundStones/Callimachus-Enterprise
# unzip Callimachus-Enterprise.zip
Run the following scripts as root.
# bin/callimachus-install.sh
Walk through the installation script providing the values as they are requested. The output of the install script will look similar to this:
# bin/callimachus-install.sh

Callimachus requires Java 7 JDK
Where is the JDK installed?
  [/usr/lib/jvm/jre-1.7.0-ibm.x86_64/..]:  /usr/lib/jvm/java-1.7.0-openjdk.x86_64
Where is the JRE installed?
  [/usr/lib/jvm/jre-1.7.0-ibm.x86_64]:  /usr/lib/jvm/java-1.7.0-openjdk.x86_64/jre
Would you like to generate a server certificate now? (type 'yes' or 'no')
  [no]:  yes
What is the secure domain or server name?
  [hostname.com]:  hostname.com
What is the name of your organizational unit?
  [Unknown]:  Example Org Unit
What is the name of your organization?
  [Unknown]:  Example Company
What is the name of your City or Locality?
  [Unknown]:  City
What is the name of your State or Province?
  [Unknown]:  State
What is the two-letter country code for this unit?
  [Unknown]:  US
Is CN=hostname.com, OU=Example Org Unit, O=Example Company, L=City, ST=State, C=US correct? (type 'yes' or 'no')
  [no]:  yes

Certificate stored in file <etc/hostname.com.cer>
Distribute etc/hostname.com.cer to all remote management agents
Note: If any of these are configured incorrectly and need to be changed, delete the directory and unzip the .zip file again. Make sure that you provide the correct values for the JDK and JRE path. As mentioned above, Callimachus requires Java 7 JDK so these variables must point to the same Java 7 install or Callimachus Enterprise will not start.
Now that the Callimachus Enterprise Install script has been run it is time to actually start the server. The server can be setup with an initial deployment or it can be setup indirectly from an already established instance.
Note: Make sure that nothing else is already running on port 1090, or else Callimachus Enterprise cannot bind to it.
1.3. Guidance for Setting Java Heap Size 
You may wish to change the default Java heap size depending on the way you deploy Callimachus. A Java heap size that is too small for your Callimachus configuration can result in "Out of Memory" (OOM) errors and a server crash.
Callimachus ships with a default maximum heap size configuration of 768 MB (-Xmx768m). That is sufficient for most small Callimachus configurations using a single deployment and possibly one additional RDF datasource.
Edit the etc/callimachus.conf file and change the JAVA_OPTS settings for the maximum heap size using the -Xmx option.
We recommend adding roughly 500 MB to the maximum heap size each time you add a deployment, realm or RDF datasource to Callimachus, up to a maximum of 2 GB (-Xmx2000m). Java running on 64-bit operating systems can use more than 2 GB of heap, but the overhead of handling large heap can slow Java virtual machine operations.
Note: Ensure that you leave adequate physical RAM for Java heap, database indexes and the operating system! For example, you might allocate 2 GB of RAM for Java heap, 1 GB of RAM for the operating system and 15 GB of RAM for database indexes to be kept in memory, for a total of 18 GB of RAM on the machine.
You may need to monitor the Java virtual machine to determine how it is performing given your particular configuration. One way to do that is via JConsole.
The default Callimachus configuration requests that the Java virtual machine dump its heap on an OOM error using the -XX:+HeapDumpOnOutOfMemoryError option. OOM errors are also reported in the location of STDOUT, generally the file etc/callimachus-stdout.log and the location of STDERR, generally the file etc/callimachus.log.0.
1.4. Setting Up an Initial Deployment 
Edit the etc/callimachus.conf file and change the ORIGIN to contain the scheme and authority of an initial deployment. Change the PORT to match the port of the authority if you are setting up an HTTP service.
Alternatively, leave the PORT commented out and use SSLPORT if you are setting up an HTTPS service. Make sure your ORIGIN reads 'https://' in place of 'http://'.
Even if you plan on setting up multiple deployments later, you must have at least one Callimachus instance setup with an initial deployment. An exert of a etc/callimachus.conf file is shown here:
# TCP port server should listen for HTTP requests.
# Most web servers listen on port 80.
# Takes effect the next time the start script is run
PORT=8080

# HTTP URL scheme and authority use when uploading webapps.
# This value should contain the scheme, host name and port number (if not port 80 or 443).
# This is the part of the URL before the path.
# Cannot be changed once the setup script is run
ORIGIN=http://example.com:8080

# UNIX based operating systems only allow root to listen on port 80.
# Use this to down grade privileges when running the start script as root.
# Takes effect the next time the start script is run
DAEMON_USER=callimachus
DAEMON_GROUP=callimachus
The host of the ORIGIN must resolve to an IP address for a local interface. If the host resolves to an external IP (not listed in ifconfig, such as 127.0.1.1) the system will not function. Modify /etc/hosts as neccessary to ensure the host resolves to an IP address listed in ifconfig.
Once an initial origin is provided in the etc/callimachus.conf file, run the setup script and start the server.
# bin/callimachus-setup.sh
The setup script will print a URL where the initial user's password can be provided and automatically launch the start script. Open a Web browser to the URL provided at the end of the setup script to assign a password. Use this password to login and follow the setup a single instance instructions.
1.5. Setup Single Instance 
Open your browser to the initial domain and click on the remote Callimachus Enterprise service. This will prompt you for a label, comment, JMX socket address, account name, and account password.
| Field | Description | Example |
|---|---|---|
| Label | The name of the instance. Used for identification in the file system. | "Local Callimachus Server" |
| Comment | A comment describing the instance. | "Our first Callimachus Enterprise installation" |
| Callimachus server JMX socket address | The local host and the JMX port found in etc/jmxremote.properties file | localhost:1090 |
| JMX remote account | The type of JMX remote account specified in the etc/jmxremote.password file. The two options are monitorRole and controlRole. Most instances will necessitate use of controlRole. | controlRole |
| JMX remote password | The JMX remote password associated with the type of account selected in the previous input field. monitorRole and controlRole have different passwords so make sure to select the correct one. | 1b3434fdfe2170180a0ccf6f3c6afdd6 |
The etc/jmxremote.password file is created the first time the setup or start script is run.
Click the Connect button. The View tab lists the currently configured realms for this Callimachus instance. Clicked the Edit tab to modify this instances' configuration.
Use the main menu Permissions entry to review and edit the connection permissions. Remove all but the admin group to restrict monitor and control access.
Following the instructions for setting up a mail server to complete the setup.
1.6. Mail Settings 
Callimachus sends email to new users when they are invited to establish an account. Email is also necessary for Digest users to request lost passwords. Configuring Callimachus to send email is therefore important to Callimachus configuration.
There are two ways to configure Callimachus to send email:
- Edit the mail properties of a server connection; or
- Provide a local mail.properties file.
1.6.1. Configuring Mail Properties of a Server Connection
The Edit tab of a server connection is used (among other things) to modify the mail settings of the server. Modify the fields listed below to match your network and click Save settings.
| Field | Description | Example |
|---|---|---|
| Mail connection type | The type of Mail service that will be used by Callimachus. The options are STMP/TLS, STMPS, and SMTP. | SMTP/TLS |
| Host address | The socket address of the mail server that will be used and the port on which it is accessible. Port 25 is common for SMTP, Port 465 is common for SMTPS. | smtp.example.com:2525 |
| From address | The email address that will be used in the From section of email correspondence from Callimachus. | joe@example.com |
| Authentication | The email account and password used to connect to the mail server previously specified. | joe@example.com, password |
1.6.2. Providing a Local Mail Properties File
Callimachus may be configured to send email by providing a local configuration file called etc/mail.properties under the Callimachus installation path.
The contents of the mail.properties file for a typical configuration looks like this:
mail.transport.protocol = smtp
mail.from = callimachus@example.com
mail.host = mail.example.com
mail.smtp.port = 25
mail.smtp.auth = true
mail.smtp.starttls.enable = true
mail.smtp.starttls.required = true
mail.user = callimachus
mail.password = secret
Where:
- The values for mail.transport.protocol may be smtp, smtps or smtp/tls
- The value of mail.from is the email address that email from Callimachus will appear to be from
- The value of mail.host is an SMTP server where you have an account with privileges to send mail
- The value of mail.smtp.port is the port on which your SMTP server operates (often 25 for SMTP or 465 for SMTPS)
- The value of mail.smtp.auth is true if the server requires authentication (all public SMTP servers should require authentication!)
- The values for mail.smtp.starttls.enable and mail.smtp.starttls.required reflect whether Callimachus should offer (and require) encrypted connections to the SMTP server
- The values for mail.user and mail.password are your account details for your SMTP server
An example file for a configuration using encryption is:
mail.transport.protocol = smtps
mail.from = callimachus@example.com
mail.smtps.host = securemail.example.com
mail.smtps.port = 465
mail.smtps.auth = true
mail.user = callimachus
mail.password = secret
1.7. Controlling and Managing Remote Callimachus Instances 
A Callimachus Enterprise instance may be used to configure other Callimachus Open Source or Enterprise instances. This allows for easier management (via a UI) and more monitoring possibilities. This diagram shows the basic configruation workflow. More details are below.

1.7.1. Step 1: Install JMX Server and Listen for JMX Requests
Callimachus Enterprise can be setup from an already setup Callimachus Enterprise deployment (instead of an initial doman). To do so, install the server by running the install script as stated earlier (do not run the setup script) and run the start script:
# bin/callimachus-install.sh
# bin/callimachus-start.sh
When asked by the install script, make sure you generate a server certificate.
Output of the start script may look like this:
# bin/callimachus-start.sh
Using BASEDIR: /opt/3RoundStones/Callimachus-Enterprise-1.x
Using JAVA_HOME: /usr/lib/jvm/java-openjdk.x86_64/jre
Using JDK_HOME: /usr/lib/jvm/java-openjdk.x86_64
Starting callimachus
Certificate was added to keystore
Imported new trusted certificate etc/example.com.cer into etc/truststore
The .cer file in the etc directory must be distributed to all Callimachus instances that will monitor or configure this service. After copying the .cer file to all other instances' etc/ directory, stop and start these instances.
You MUST have JAVA_HOME correctly configured for this to work. It MUST be the JRE path, not the JDK path.
The enterprise server is now listening on JMX port 1090 (as specificed in etc/jmxremote.properties), but has not yet been configured. Another Callimachus Enterprise instance must be setup to complete the Callimachus Enterprise instance's configuration.
1.7.2. Step 2: Create a Server Manager on a Controlling Callimachus Enterprise Instance
You will require the username/password combinations defined in etc/jmxremote.password on the new Callimachus instance. The etc/jmxremote.password contains two account passwords (monitorRole and controlRole) that can be used to monitor and configure this service (respectively).
The etc/jmxremote.password file is created the first time the start script is run.
Open your browser to your controlling Callimachus Enterprise instance. This will be another (already setup) Callimachus Enterprise. Navigate to a folder where you wish to manage your remote servers and select "Server" from the folder's Create menu. This will prompt you for a label, comment, JMX socket address, account name, and account password.
| Field | Description | Example |
|---|---|---|
| Label | The name of the instance. Used for identification in the file system. | "Remote Callimachus Server" |
| Comment | A comment describing the instance. | "Our next Callimachus Enterprise installation" |
| Callimachus server JMX socket address | The local host and the JMX port found in the etc/jmxremote.properties file. | example.com:1090 |
| JMX remote account | The type of JMX remote account specified in the etc/jmxremote.password file. The two options are monitorRole and controlRole. Most instances will necessitate use of controlRole. | controlRole |
| JMX remote password | The JMX remote password associated with the type of account selected in the previous input field. Make sure to select the correct one. | 1b3434fdfe2170180a0ccf6f3c6afdd6 |
Click the Connect button. The View tab lists the currently configured origins for this Callimachus instance. Clicked the Edit tab to modify the remote instances' configuration.
Change the HTTP server state to Running and provide a Port that will match the origin. Fill in the mail settings as described above. Click the new deployment link and fill in the form as describe below.
| Field | Description | Example |
|---|---|---|
| Primary origin | The primary origin is where the Callimachus Web files will be stored. | http://example.com/ |
| Decode unreserved characters, and normalize | Lowercase scheme and authorities, replace '%2F' with '/', '%28' with '(', and more in path segments. | Disabled by default |
| Store, but never observe, the canonical IRI | Check this if the IRI in the RDF store is different from the IRI hosted by Callimachus. | Disable for most deployments |
| Canonical IRI and their alias | List the IRI space in the RDF store followed by other IRI spaces that identify the same set of resources. | /dbpedia/ http://dbpedia.org/resource/ |
| Purge obsolete data after | Obsolete data is past versions of current resources or deleted resources. This number is measured in days. | 7 |
| Invite new admin user | The email address of the user you would like to have administrative privileges on the new deployment. | joe@example.com |
Click Setup then click Save settings and an email will be sent to the email address provided once the Web service is setup and running.
1.7.3. Step 3: Manage Your Remote Callimachus Instance
You may monitor the status of your new Callimachus instance by looking at the view of the Server Manager you created. Editing the Server Manager will allow you to change its configuration.
1.8. HTTP Server States 
When configuring a Callimachus server you can change its state via the Web interface. You have five options: Offline, Starting, Running, Stopping, and Stopped. Each of these indicate a distinct state of the server. When the Edit template is loaded (on read), the value represents the current state of the server. When the Edit template is saved (on write), these values are interpreted as follows:
| State | Description |
|---|---|
| Offline | Stops the server before applying Mail and New Realm changes. |
| Starting | Will start or restart the server after setup. |
| Running | Will ensure the server is running after setup. |
| Stopping | Will stop the server after setup. |
| Stopped | Stops the server before applying Mail and New Realm changes. |
Chapter 2. Managing Deployments and Realms
2.1. Shared Deployment 
Two or more deployments can share the same server resources (same server sockets). To add another deployment fill in the new deployment form under the Edit tab of a server.
| Field | Description | Example |
|---|---|---|
| Primary origin | The primary origin is where the Callimachus Web files will be stored. | https://example.com/ |
| Decode unreserved characters, and normalize | Lowercase scheme and authorities, replace '%2F' with '/', '%28' with '(', and more in path segments. | Disabled by default |
| Store, but never observe, the canonical IRI | Check this if the IRI in the RDF store is different from the IRI hosted by Callimachus. | Disable for most deployments |
| Canonical IRI and their alias | List the IRI space in the RDF store followed by other IRI spaces that identify the same set of resources. | /dbpedia/ http://dbpedia.org/resource/ |
| Purge obsolete data after | Obsolete data is past versions of current resources or deleted resources. This number is measured in days. | 7 |
| Invite new admin user | The email address of the user you would like to have administrative privileges on the new deployment. | joe@example.com |
Clicking Setup will create the new deployment with the default digest authentication. From the View tab you can click through to the new deployment and add resources or configure it.
2.2. Multiple Realms 
Callimachus can be configured to respond to multiple domain names. This allows the same users, applications, and data to be used across multiple realms. To add an additional realm fill out the Add another realm input field with the scheme, authority, and path that resolves to an IP address of this instance.
| Field | Description | Example |
|---|---|---|
| Add another realm | Provide the scheme, authority, and path | http://www.example.com/my-realm/ |
While most Web browser will connect to an HTTP origin that includes HTTPS resources, most will not load HTTP resources from an HTTPS origin. This means that an http deployment should not also have an https realm.
Clicking Save settings will create the new realm. From the View tab you can click through to the new deployment and add resources or configure it.
2.3. Realm Authentication 
Each realm has its own authentication manager(s). From the server connection Edit tab, click on the edit icon next to the realm you want to change. These managers are responsible to authenticate the user agents with a user identifier. These user identifiers are used to discover what groups and what permissions the given user agent is granted. There are five supported types of authentication managers:
Chapter 3. Networking
3.1. Apache Proxy to Callimachus 
Apache HTTP Server 2.2.18 or later is recommended.
Callimachus should be setup using the ORIGIN that resolves to Apache Server (not the Callimachus service directly).
Add the following to Apache's main configuration file to setup a reverse proxy to the service running on localhost:8080. On Linux, that file is generally at /etc/httpd/conf/httpd.conf.
# Reverse Proxy to Callimachus
ProxyPass / http://localhost:8080/
ProxyPreserveHost On
AcceptPathInfo On
AllowEncodedSlashes NoDecode
3.1.1. Related Apache documentation
The following Apache documentation relates:
- AcceptPathInfo Directive
- AllowEncodedSlashes Directive
- ProxyPass Directive
- ProxyPreserveHost Directive
3.2. Running Callimachus on Amazon EC2 
3.2.1. Purpose
This procedure describes how to run Callimachus on Amazon EC2.
3.2.2. Procedure
| Step | Action | Notes |
|---|---|---|
| 1 | Create an Elastic Block Storage (ESB) disk using the EC2 management console. |
|
| 2 | Format the ESB disk | Command: # fdisk /dev/sdf |
| 3 | Make a file system on the ESB disk. | Command: # mkfs -t ext2 /dev/sdf1 |
| 4 | Mount the disk. | Command: # mount /dev/sdf1 /opt |
| 5 | Verify to see that the disk is mounted. |
Command: # mount | grep sdf You should see an entry in /etc/mtab |
You must configure Callimachus with an ORIGIN authority that is a CNAME to the amazonws.com hostname (something like ec2-123-compute-1.amazonaws.com) or a local/internal alias.
3.3. Remote Service Without DNS 
There are two techniques to override local client side DNS resolution. This can either be done onthe client with the etc/hosts or by using a SOCKS tunnel in Firefox.
On the remote Service ensure that the ORIGIN authority resolves to an IP address of one of the host's network interfaces.
3.3.1. Modify /etc/hosts
On the client change the authority to resolve to the IP address of the remote host. On Mac and Linux the file is located in /etc/hosts, on Windows it is in %SystemRoot%\system32\drivers\etc\hosts
On Mac the following must be run after any changes to /etc/hosts.
sudo killall -HUP mDNSResponder
3.3.2. SOCKS Tunnel
On the client run the following to setup a temporary SOCKS tunnel to the remote host.
ssh -D 8080 example.com
In Firefox open about:config in the address bar. Enabled network.proxy.socks_remote_dns and add localhost:8080 SOCKS proxy. This will proxy all Web traffic through the SOCKS tunnel and use the remote server for host name resolution.
Chapter 4. Loading Data
4.1. Export and Import 
Callimachus offers the ability to compress the contents of any directory into what is called a Callimachus ARchive file, or CAR file (.car extension). CAR files are ZIP version 3 format compressions of all contents recursively down a folder tree. This allows for content in Callimachus to be moved around a single instance or transferred between multiple instances with ease. It is also an easy way to move code from development into a production environment without complex merging.
CAR files are the primary means of backing up Callimachus applications.
Callimachus also allows the importation of ZIP files into folders. A ZIP file cannot be used to import files without file extensions (such as OWL classes).
4.1.1. Export Folder Contents
 Content can be exported from the View tab of any folder within Callimachus, including the top level Home folder.
- Select "Export folder contents" from the Main Menu in the upper right.
- A CAR file will be downloaded into your computers downloads/ directory.
To unpack a CAR file on your computer just change the extension from .car to .zip and unzip it using software that supports zip 3 format. Unpacking a .car may be useful for storing contents in a revision control system such as Git or SVN. You can see an example of this in action in the sample applications on GitHub.
4.1.2. Import Folder Contents
The same way that content can be exported from any folder in Callimachus, content can also be imported. This action can only be taken from the View template of a folder.
- Select "Import folder contents" from the Main Menu in the upper right.
- Click "Choose files" and select a previously exported .car file (or a .zip file in zip 3 format)
- Click the "Import" button and contents will begin to be uploaded. Once the upload is complete the content will be loaded into that folder and you will be redirected back to the View template for the folder.
Importing a .car may be a common action in your workflow but it is a very powerful one. Importing a .car into a folder permanently deletes all existing contents of the folder. Make sure to always review your actions and ensure there is nothing you will lose by overwriting the current contents of a folder.
Common "Gotchas"
- Importing a folder permanently deletes all the current contents of the folder into which you are importing. Be sure of the action you are taking.
- Importing folder contents is not the same as uploading a file. Uploading a .car will upload the file itself as a binary for hosting. Only importing will unpack it and absorb the contents of the .car.
- When exporting the Home folder don't forget you're also including the /callimachus directory, which contains the files that Callimachus uses to run itself. This folder must remain in place at the top level and exporting and importing it is not the same as upgrading your Callimachus version. Upgrading must be done by following the instructions included in the RELEASE_NOTES.txt file with every distribution.
- Be cogniscent of the paths (your/file/path) you've used in your Callimachus applications as they may break when you move an application. This is why we encourage the use of relative URIs wherever possible. For example, if you have /articles and /images and need to reference an image, use src="../images/your-image.png" instead of src="/images/your-image.png". If you used the latter, moving it to a subdirectory somewhere else would break the connection.
4.2. Supported File Types 
Callimachus Enterprise supports the upload and hosting of the following file types:
- CSS (.css)
- Docbook (.docbook)
- HTML (.html, .xhtml)
- Icons (.ico)
- Images (.svg, .gif, .jpg, .png)
- JavaScript (.js)
- PDF (.pdf)
- RDF (.ttl, .rdf)
- SPARQL Query (.rq)
- Text (.txt)
- Web Open Font (.woff)
- XQuery (.xq)
- XProc Pipeline (.xpl)
- XSLT (.xsl)
Callimachus ARchive (.car) and ZIP files may be uploaded and will be served as files. If you want to replace the contents of a folder using an archive file, look in the main menu on a folder view for the menu item "Import folder contents".
4.3. Callimachus Shell 
4.3.1. Overview
A shell for the Callimachus Project (http://callimachusproject.org) that implements a client for the Callimachus REST API.
The Callimachus shell may be used in either interactive or non-interactive modes. When used in interactive mode, a prompt is given which accepts built-in commands. The built-in command "help" may be used to obtain usage information on built-in commands.
When used in non-interactive mode, the shell will accept a file on STDIN for processing. The file is expected to contain Callimachus shell commands.
4.3.2. Usage
cash.pl -i
cash.pl [-s] -e ’<command>; <command>; ...’
cash.pl -u
cash.pl -v
cash.pl < script-file

  -e | --execute      Execute the following commands.  Commands are separated with semi-colons.

  -i | --interactive  Provide an interactive shell environment with commands specific to Callimachus operations.

  -s | --silent       Only provide output where necessary (e.g. errors and cat command).

  -u | --usage        Show usage directions and exit.

  -v | --version      Report the version number of this shell.
4.3.3. Commands
To get details for a particular command:
help <command>
| # | Comment |
| cd <folder> | Change the active folder |
| debug | Report the state of the shell's server object |
| echo <string> | Echo a string to STDOUT |
| exec <command> | Execute command on the calling shell |
| exit | Exit the shell |
| export CAR [<filename>] | Exports the contents of the active folder into a CAR file |
| get <file_title> | Retrieve a file from the active folder and save it |
| help | Get this help message |
| import CAR <filename> | Imports the contents of the filenme (a CAR file) into the active folder |
| login <user><pass> | Login to the active server |
| logout | Log out from the active server |
| ls | List the contents of the active folder |
| mkdir <foldername> | Make a new folder |
| mv <filename1><filename2> | Move filename1 to filename2 |
| put <filename> | Store a file in the active folder |
| pwd | Return the path of the active folder |
| quit | Exit the shell |
| rm <filename> | Delete a file from the active folder |
| rmdir <foldr_name> | Delete a folder from the active folder |
| server <url> | Set the Callimachus server authority. Optionally set an HTTP proxy (-p <proxy>) |
| set <option> <value> | Set a shell option |
| version | Report the version of this shell |
4.3.4. Command Details
| # | Lines beginning with # are considered comments and are not processed |
| cat | cat <file title>: Retrieves the designated file and send it to the standard output. The file title must be exactly as it appears in a folder listing, including spaces. This action may require authorization (see 'help login'). |
| cd | cd <folder title>: Changes the active folder to the name given. The title provided may be relative to the current folder (without a leading '/') or absolute to the top folder for the active server (with a leading '/'). Leading '..' characters refer to the parent folder. If the folder title is omitted, the folder will be changed to the top level ('home') folder. |
| debug | debug: Report the state of the shell's server object. This command is primarily used for debugging the shell. |
| echo | echo <string>: Echo a string to STDOUT. This command may be used (e.g.) to mark up output when run with -e or a script file. |
| exec | exec <command>: Issues a command to the calling shell. The exec command allows users to run external commands without exiting the Callimachus Shell. |
| exit | exit: Exits the shell. |
| export | export CAR [<filename>]: Exports the contents of the active folder into a Callimachus Archive (CAR) file. If a filename is not provided, the server's suggested filename (consisting of path-to-folder-servername.car) will be used. This action requires authorization (see 'help login'). |
| get | get <file title>: Retrieves the designated file and saves it to the local file system. The file title must be exactly as it appears in a folder listing, including spaces. This action may require authorization (see 'help login'). |
| help | help: Provides a list of built-in commands. |
| import | import CAR [<filename>]: Retrieves the designated file and saves it to the local file system. The file title must be exactly as it appears in a folder listing, including spaces. This action may require authorization (see 'help login'). |
| login | login <username> <password> |
| logout | logout: Logs out of the active server. Actions requiring authentication will no longer work. |
| ls | ls: Lists the contents of the active folder. Subfolder names are followed by a / character, e.g. 'rdf/'. Files are followed by their type in parentheses, e.g. 'helloworld (graph)'. |
| mkdir | mkdir <foldername>: Make a new folder called foldername in the active folder or as provided by a path. The folder name given may be a URL, path or simple alphanumeric name. Folders will be created along a given path, as required. This action requires authorization (see 'help login'). |
| mv | mv <filename1><filename2>: Move filename1 to filename2. Filenames may be simple names, which will rename a file in the active folder, paths relative to the active server or fully-qualified URLs. |
| put | put <filename>: Puts the designated file onto the server in the active folder. The filename will become the filename on the server, but will be changed to lower case. This action requires authorization (see 'help login'). |
| pwd | pwd: Returns the path of the active folder. |
| quit | quit: Exits the shell. |
| rm\s+ | rm <file title>: Deletes the designated file from the active folder. The file title must be exactly as it appears in a folder listing, including spaces. This action requires authorization (see 'help login'). |
| rmdir | rmdir <folder title>: Deletes the designated folder from the active folder. The folder title must be exactly as it appears in a folder listing, including spaces. This action requires authorization (see 'help login'). |
| server | server <url> or server -p <proxy><url>: Sets the Callimachus server authority. For example, 'server http://localhost:8080/' creates a server object with that base HTTP authority. The server URL must refer to a Callimachus instance. Further commands will relate to the last set server authority. Optionally set an HTTP proxy with -p to allow connection to a Callimachus server behind a proxy or running a DNS name different from its HTTP authority. The <proxy> field must contain a URL and may contain an optional port number (e.g. http://www.example.com:8080). The proxy port defaults to 1080 if not provided. The <proxy> field must contain 'http://'. |
| set | set <option><value>: Set a shell option to the specified value. Current options are 'debug', which may be set to a non-negative integer value to cause an increasing level of additional information to be displayed, and 'autols', which may be set to 1 to cause an 'ls' command to be issued after every 'cd' command. |
| ver | version: Report the version number of this shell. |
Chapter 5. Users and Groups
5.1. Adding users 
To add a new user, an existing user who is part of the "admin" group must:
- Navigate the the /admin URL.
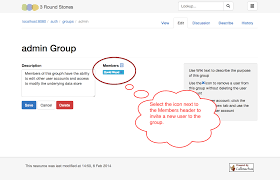
- Select a group into which the new user is being added. That group's edit template will be accessed when the link is clicked.
- Invite a new user using the icon in the Members field.
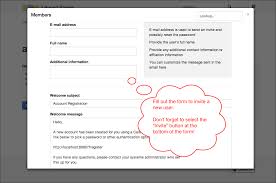
- Complete a user invitation form for the person to add.
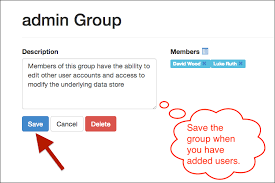
- Save the group.
- Add the user to other User Groups as needed by clicking on the Members icon and using the lookup search box in the dialogue.
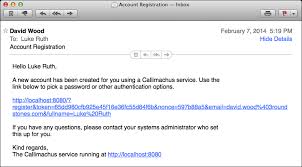
The new user will receive an email invitation with a registration link and instructions on how to log in.
It is necessary for Callimachus to send email in order to invite new users! Make certain that your etc/mail.properties file is correctly configured before you attempt to invite users. If your users do not receive invitations, check the etc/mail.properties file for correctness first.
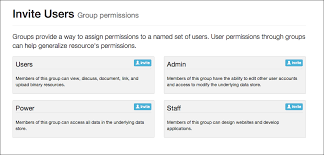
The /admin screen is shown in the following screenshot. You are advised to follow the Principle of Least Privilege when adding users to groups. Select the appropriate group:
Then add one or more members:
Selecting the icon to the right of the Members header will display a new user invitation form:
When you have finished editing the group, don't forget to save your changes!
A user invitation email message will look something like this:
5.1.1. The Super Group
There is an additional group that is present in Callimachus by default: The "super" group. Members of the super group have privileges to view and modify content in the /callimachus folder tree. That is, they may modify the core of a running Callimachus instance.
The super group is useful for users wishing to fully explore Callimachus or to experiment on a running instance. The Callimachus development team uses the group on a regular basis to develop the product.
However, enabling the super group can also be dangerous, especially for those systems that are accessible from the public Internet. Any user account that is subverted and has membership in the super group will have permissions to modify many aspects of Callimachus. So, we strongly recommend that Internet deployments not give user accounts membership in the super group.
Do not use the super group for Callimachus instances that are deployed to the public Internet.
You can create the initial Callimachus user in the “super” group at setup time by running the setup script with the -g flag:
bin/callimachus-setup.sh -g /auth/groups/superOnce the initial user is a member of the super group that user will have permission to invite other users into that group.
Chapter 6. Monitoring
6.1. JConsole Monitoring 
Callimachus can be monitored using jconsole that is provided with a JDK install. The server certificate, created by the install script, must be trusted for jconsole to connect. This can be done by copying the etc/truststore from the server to the machine that will run jconsole. Run the following command, then provide the host name or IP, port 1090, username controlRole and password (found in etc/jmxremote.password) to the connection dialogue box.
jconsole -J-Djavax.net.ssl.trustStore=etc/truststore
Chapter 7. External Connections
7.1. External Datasource 
7.1.1. Description
A Datasource is a SPARQL endpoint service that gives you the ability to define and access additional repositories within a single origin. For example /sparql is the Datasource that gives you read/write access to the default Sesame repository that Callimachus uses. By creating a new Datasource you are creating a certain repository with custom configuration. That repository can be externally hosted.
7.1.2. Managing Datasources
Creating a Datasource
| Step | Action |
|---|---|
| 1 | If using an external repository, ensure it is currently running and available |
| 2 | Configure external repository with any additional settings necessary to accept an external connection |
| 3 | Navigate to the Server object that is currently connected to the operational Callimachus Enterprise instance |
| 4 | Click the "Edit" tab and then click the edit (pencil) icon next to the realm you wish to configure |
| 5 | Click the new window icon next to "Datasources" and fill out the form with the appropriate values |
| 6 | Hit "Create" to create the Datasource, then "Save" to save the Deployment, then "Save Settings" to save the configuration of the server. |
The following fields are avialable when configuring a new Datasource and/or replacing an existing Datasource.
| Field | Description | Sample Value |
|---|---|---|
| Service Endpoint URL | This is the URL where the datasource will be accessed. This URL must start with the same host name as your Callimachus Instance. | http://example.com/data |
| Repository Config | This is the Sesame configuration file that describes to Callimachus exactly where the repository is located and how it will be configured. | |
| Languages | Checking SPARQL Query allows Read operations to be performed against the Datasource. Checking SPARQL Update allows Write operations to be performed against the Datasource. | |
| Entailment | The Entailment checkboxes serve as a form of documentation that states certain attributes about the Datasource. Full documentation on the different types of Entailment can be found here. | |
| Features | These features can be enabled or disabled for your Datasource. Full documentation on the different features can be found here. |
Note: If you want to modify this Datasource programmatically (i.e. from a Pipeline) you will need to set the Permissions for the Datasource so that the System group is listed under "Editor".
Editing a Datasource
Once a Datasource has been created you can go back and edit any of the values you entered by selecting the "Edit" tab when viewing the Datasource. You can change both the Label and the Comment as well as whether or not Read and Write operations can be performed against the Datasource.
Deleting a Datasource
You can delete a Datasource at any time by navigating to the "Edit" tab of the desired Datasource.
Note: This does NOT delete any underyling data in external datastores. It simply deletes the SPARQL endpoint service on the Callimachus side.
7.1.3. Using a Datasource
Callimachus Datasources expose all SPARQL 1.1 commands. The most common you probably will find yourself using to get started are LOAD and SELECT. The interface is just a large textarea in which you can type your commands. If you are working with a small dataset you can perform the following query to ensure the Datasource is working as expected:
SELECT DISTINCT ?type WHERE {
    ?thing a ?type
} ORDER BY ?type LIMIT 50